TTRPGkids Tips and Tricks: Tracking items and managing inventory in TTRPG’s with kids!
In a previous article that I wrote titled Adjusting TTRPG Mechanics for Kids, I gave a quick discussion on how to track items, spells, and attacks in games with kids. This included using notecards, pictures, simplified descriptions, and a reduced list. You can check it out here, but below, I’m going to expand on that, give some examples, and provide some more ideas and tips to try!
Jump to:
- What in-game items teach kids
- Determine how structured the items are
- Determine how many items your kid can track
- Pick a method for item tracking (lots of examples here!)
- Items tutorial and giving reminders
1. What in-game items teach kids
Adding item tracking to a game (versus just using spells and actions) can teach kids A LOT of important skills. Playing with my little one, I have seen an increase in decision-making capabilities, curiosity, and just regular old excitement in any games where we use items either as a key mechanic of the game or as a reward for hitting game milestones.
We’ve been able to apply all these lessons to real life in some interesting ways. Everything from talking about if we should use up the last of the tape or save some for another art project to packing for a trip to the zoo together to explaining why we work to make money to buy things has circled back around to in-game examples.
Creativity!
The number one here is creativity! If you give out open-ended items or items that lead to creative options (boots that let you walk on walls, something that turns you invisible, etc) it adds more tools for your kid to use in interesting ways!
Preparedness and planning
Choosing items to start out on an adventure or deciding between two items to buy at a shop helps to teach about planning and being prepared. My kid originally ignored getting potions when shopping in-game but now knows how important they are for later even if they aren’t needed right now. That’s a really important step for a kid to be able to think of and prepare for the “later” instead of just the “now”. It’s helped me explain why we need to take time to pack sunscreen, snacks, etc and gotten kiddo involved in that process when there was previously little interest.
Value and limits
If you include shops, currency, or trading in your game, having items to use for bartering can also be an awesome tool for teaching about money and the value of your items. I don’t know how many times kiddo has asked why we have to work and I’ve had to explain that we work to earn money to be able to buy food, clothes, etc. before I just started using examples from our games and adding more shops.
We’ve also used it to explain value and limits – that there’s a limited supply of things in the house and if we’re rough with things and they break, it costs money just like in the game we played… and we don’t always have enough to just replace stuff all the time. There’s lots of make believe and educational games or exercises outside of TTRPG’s that teach this, but it is also very natural to be integrated into a TTRPG that uses items.
Lots more!
And there’s a TON more ways that this helps kids (risk/reward, making choices, gradually increasing tracking capabilities, vocabulary expansion, etc) – my point here is that this all eventually applies to real life situations even though it all starts in a game.
2. Determine how structured the items are
Some games give a lot of explanation for what an item does, it’s backstory, etc – this is great for people who want lore and like getting into mechanics (I’m one of them). However, having a big paragraph of text and a lot of constraints or mechanics to remember can be understandably difficult for a lot of players (both kids and adults)… but then go too far the other way, and it can be difficult for players who want some constraints and structure.
One way that I like to look at this is figuring out what “level” of complication I want the item to be for my players. To keep things simple, I broke into three “levels” but there’s definitely more divisions/variations that you can make
- Level 1 = Give players the name of the item and let them decide what it does or giving just very simple guidelines (i.e. saying this is single use or it takes 1 turn to use)
- Level 2 = Give players the name and a few bullet points describing what the item is and how it works with description scaled to player’s level
- Level 3 = The item has lore and very well defined rules – this is about a paragraph or two of text
Generally, I use level 1 for my 3 year old and the StoryGuider games that I’ve written due to the little ones not being able to read and my wanting to encourage creativity over remembering mechanics at this stage.
Then, I plan on slowly transitioning to using something like a level 2 with kiddo once we get some basic reading skills under our belt. I’ve also used this level of complication for the EnerGeodes game that I wrote and for most items that I have in my normal TTRPG campaigns with my friends.
The level 3 items I save for a select few big-ticket items in my regular TTRPG sessions and probably won’t introduce these to kiddo until we hit about a 5th grade reading level so we don’t get overwhelmed with too much text.
And… if the games that you play have everything at a level 1 or a level 3 and your kids are ready to play at level 2, feel free to adjust it! I do this all the time with games for my kid (adjusting from level 2 or 3 down to level 1), and we maintain the spirit of the game while making it accessible to my kid so we can play.
3. Determine how many items your kid can track
Similar to this part in my spell tracking guide, you want to be careful how many items you give your kids to track. If I give kiddo too many items, we start forgetting what we can use or kiddo has a REALLY hard time trying to decide between too many options and the game locks up.
In games with my adult friends, they forget to use items if they have too many, and I know my husband gets a bit overwhelmed with a big inventory. While learning to play TTRPG’s, I think most of my adult player’s inventory limits is about 15 separate items that they actually actively use… and the rest is just extra stuff that they forget about or try to sell during a shopping session. It’s definitely possible for them to use more, but this is just what I’ve seen with most of my groups.
For younger players, the limit is probably a bit tighter. For my 3 year old, I’ve found that (with “level 1 complication” items) kiddo can track about 3 items independently and about 6 items if I help before kiddo feels overwhelmed or forgets what’s there.
This will vary for each kid, so I recommend to start out with a couple items and gradually increase from there, only offering more items if they use or trade something (a good way to rationalize this in game is only having so many slots in their backpack). Kids will still learn key decision making skills and be able to get creative with a smaller inventory, and having it more manageable means that you can still keep the flow of the game going and progress gradually as your kid’s skills grow.
4. Pick a method for item tracking
There are a lot of ways that I’ve used to help kiddo track items despite limited reading skills – I’m going to list some here, but there’s also a TON more (please share in the comments if you have some ideas too!). Having a consistent and accessible tracking method allows my kid to have inventory autonomy and feel confident about being able to manage things independently.
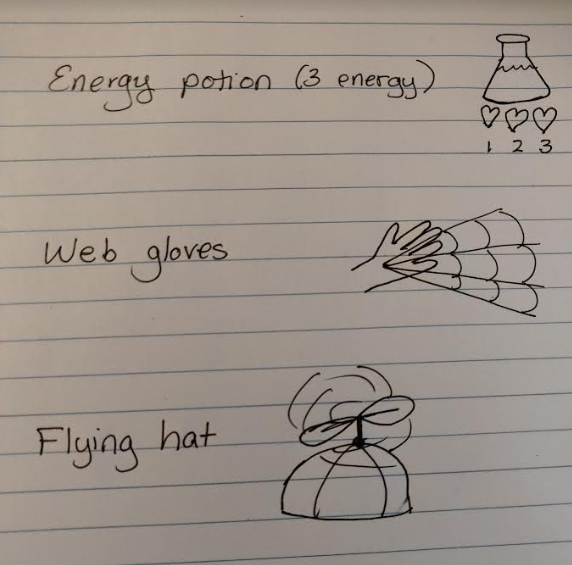
Separate sheet with pictures
First and probably easiest to set up is to just have a separate sheet for inventory (so it isn’t scrunched up with the rest of the character details) and draw some pictures to represent the items. The pictures remind your kid what they have without having to read the word, and, if they are learning to read, it can help to practice sight word recognition without a ton of pressure.
Your pictures don’t have to be spectacular, and you could even find clip art to print out if you don’t want to draw – as long as they let your kid know what’s going on, that’s what matters.
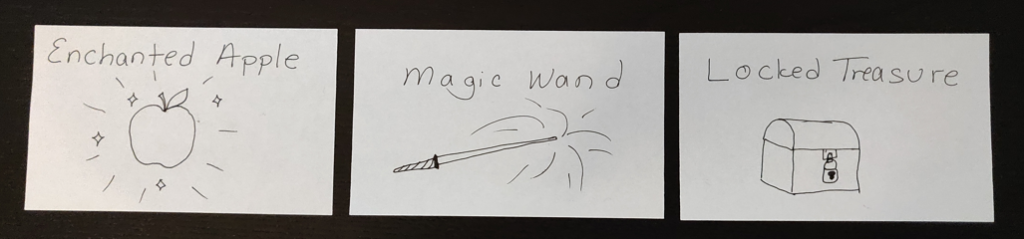
Notecards
Next up is notecards! This is my preferred method because it doesn’t take too long to make (again, the pictures don’t need to be perfect and you could even print and cut out the cards from a sheet of paper if you don’t want to draw) but it gives your child something to hold onto and move around, trade, or organize.
Having something kind of tangible or tactile can help with letting your child feel connected to the items and makes it very clear when something is being used up or traded away. If items are on a separate sheet, they get crossed out when used, which can get messy, or you need to stop to draw when your kid finds something new. With notecards, however, you can trade them between merchants or players freely, and is really clear that something is “gone” when they trade a card in and can no longer hold onto it.
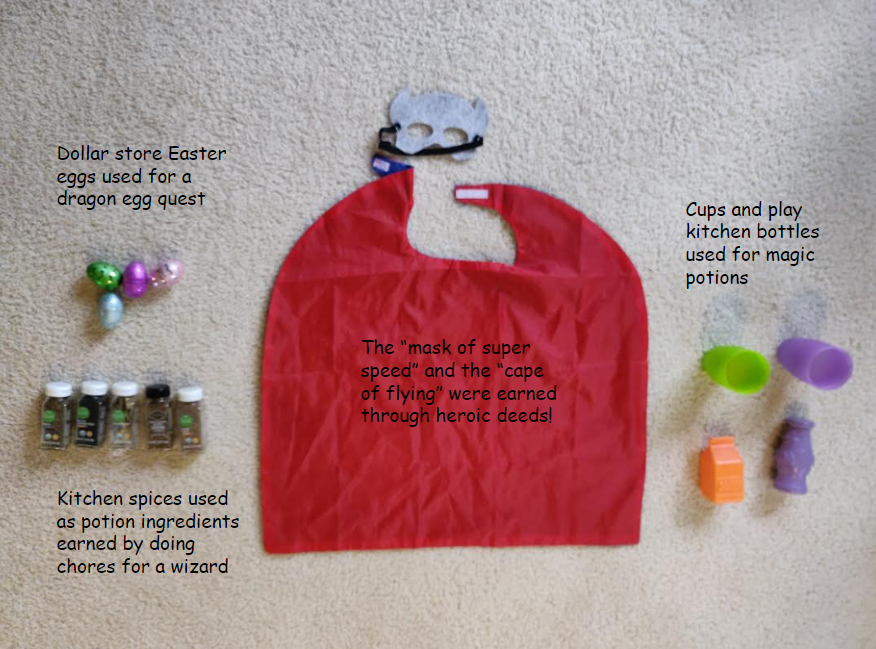
Toys, stickers, objects, or dress up
To keep going further onto the tactile element path, you can also use toys or dress up costumes too! I’ve found that this has worked really well if we only have a few items to keep track of, and it is A TON of fun with kiddo. It gives my child a toy to fidget with while we tackle the story bits, we can trade items back and forth, and it’s just fun to play with.
We have some dress up capes and hats that we have dubbed “magical flying capes” or “the kitty ears of cat-speak” and have used drink cups to represent potions, playfood for potion ingredients used in magical recipes, and blocks for rocket ship parts that were scattered across a mysterious planet. I have a few other examples shown below including using dollar store Easter eggs and spices from our kitchen cupboard (with this one, we also smelled each “potion ingredient” to determine which ones we wanted).
I will note again, kiddo is 3 years old, so success with older kids may vary. I know my adult players have said they’d like potion tokens and the like, so see what works and adjust if needed!
The Mages and Macrophages example
I do also want to give a shout out to Mages and Macrophages, which is a game that comes with a really cool item tracking system that uses tokens that slot into a representation of the character. Items are color coded, have pictures, and contain just enough information to support the mechanics without getting overwhelming.
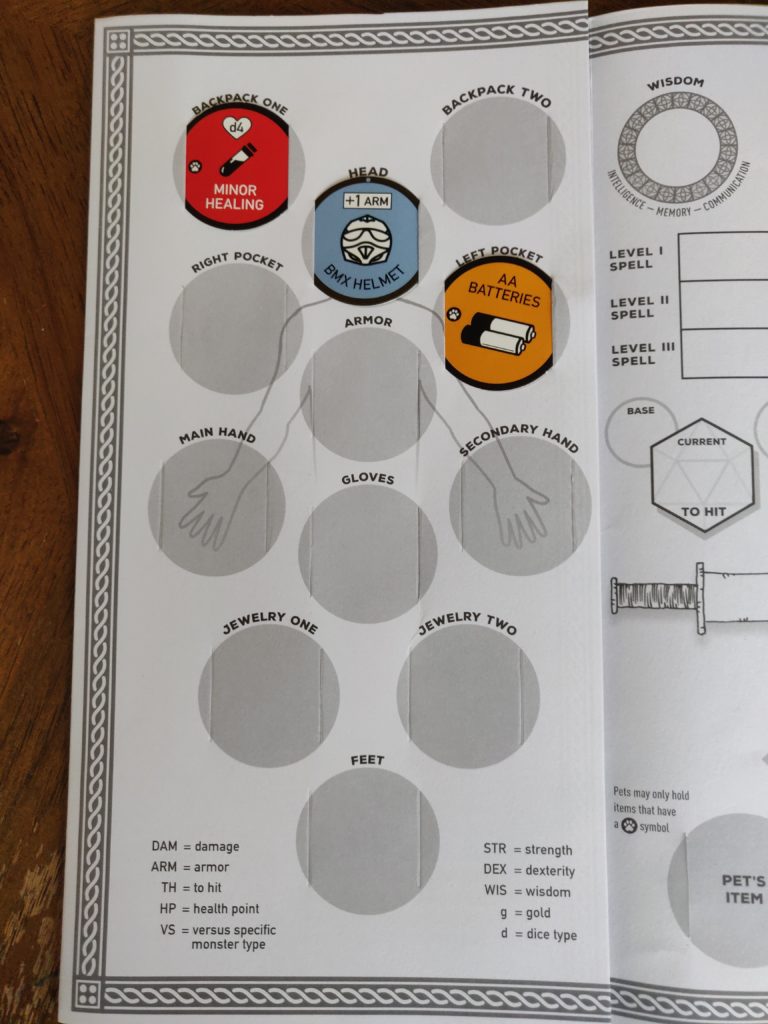
When my family played this game, it allowed us to track a lot of items and very quickly see and use our inventory. It would be a bit of set up, but this was an awesome item tracking example that was built into the core of a game from the start, and I wanted to make sure it was mentioned here.
5. Items tutorial and giving reminders
In games with kiddo, StoryGuider, and my regular campaigns, I like to try and give examples or reminders of using items, at least a few times.
I’ll drop reminders during tough situations or when kiddo is frustrated – we take a minute to ask what’s going on emotionally and then to think. Once we get to the in-game part, if my child doesn’t automatically start this process independantly, I ask for some ideas then ask what spells or items are available. Kids sometimes need help to pull up that logic process when things get emotional, and that’s part of the learning process here. It’s OK to teach and practice like this – they still learn, and will eventually start doing this on their own.
In session 1-2 of a new campaign, I try to create situations where players are prompted to use items to sort of kick off the mindset for the rest of the campaign that you can and should use items here (don’t hoard them!), and I do the same with kiddo, but with a little more effort.
For my 3 year old, when we get a new item, we talk about what it does, try it out or imagine how to use it to help later, and make sure to laugh about some silly ways to use it too. This builds up a process of future-thinking and encourages creativity whenever something new is presented – it builds that foundation for the items in-game and also is practice for approaching new things in life with curiosity and imagination.
In conclusion…
Adding items and inventory to your games is a great way to build core skills with your kids and have fun getting creative with a potentially new game element! There are a lot of ways to adjust things such as complexity and tracking progress with your child’s abilities and comfort level so you can find that balance of teaching and having a smoothly flowing game.
I hope these ideas have helped, and please let me know in the comments if you use any of these suggestions, have some ideas of your own, or have questions!