
5 Tips and Tricks for Tracking Spells and Magic in Kid’s Tabletop Role-Playing Games
In a previous article that I wrote titled Adjusting TTRPG Mechanics for Kids, I did give a short answer to how to handle things like spells in your games. This list included using notecards with pictures, simplifying descriptions, and using a reduced list. You can check it out here, but below, I’m going to expand on that a bit, give some examples, and provide a few more ideas to try out!
Jump to:
- Determine how many spells your child can handle tracking
- Use pictures or objects to represent spells
- Use simple, low stress mechanics
- Code spells slots for easy tracking
- Practice using spells before they NEED to be used
1. Determine how many spells your child can handle tracking
My number one piece of advice is to first figure out how many spells your child can track without too much assistance from you.
When I’m playing a game, I can remember that maybe I get an action, a bonus action, and movement. I know my top 10 go-to spells that I typically cast and that 3 of those are cast as a bonus action, so I can piece together how that all will play out. I also have a reference sheet that I can read to remind myself what to do.
For my 3 year old, he can remember maybe 3-4 spells at his character’s disposal, and he also can’t read yet to be able to look up details. So, at any given time, I will give my kid about 3-4 spells to remember rough details for, and that’s where he can play without a ton of assistance.
With your child, that number will be different based on age, familiarity with the game, etc. If they are young, and this is their first game, I would recommend to start with 2-3 options and then add more in as they’re able to handle it.
Another approach to this is to give your child a full spell list but then have the DM or an adult helper track it. The kids would ask the DM questions about what they can do, and then the DM reads the spells list to tell them what options they have. This is totally an option and doesn’t require any game modification, however, I have tried this with my kid, and he gets frustrated when waiting for the list or that he can’t do it all by himself. He’s been a lot happier having the control to give the answers without my assistance. There are definitely fewer options with our reduced list, but it lets my kid have autonomy; I’m not always saying what to do all the time. This last bit is another element that will depend on your particular child and how they best handle it, so it is worth considering both approaches.
2. Use pictures or objects to represent spells
One of the StoryGuider games that I wrote starts introducing multiple spell options to kids for them to use however they want. Instead of giving a spell list, I made coloring pages that had pictures to represent each spell. This gave a picture to track (instead of words for kids who can’t read), and it got them to interact with the picture by coloring it (so it is easier to remember).
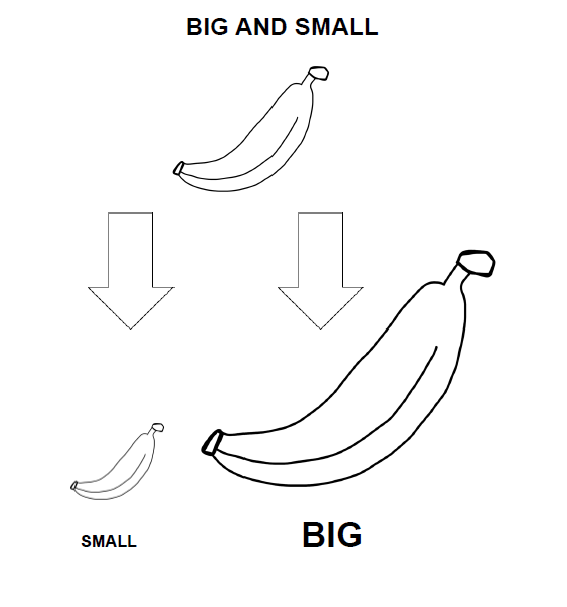
This one here is for a spell to make things bigger or smaller:
You can also do this by making spell cards that have a picture on the front and maybe words on the back or by giving your child an object to represent the spell instead. Both give a visual and/or tactile way to connect with the material since not all kids can connect with reading the words yet.
For objects, something like a flashlight to represent a light spell or even just a red building block to represent a fire spell can work. Some others that we’ve used before were an ice pack for a cold spell, a blanket to hide under for an invisibility spell, and an umbrella for controlling the weather. It’s fun to get creative with this and give some extra opportunity for your kid to play even more during the game!
3. Use simple, low stress mechanics
If you look at the spell book for a lot of games, there’s sometimes a lot of rules. There can be casting components, casting time, casting distance, damage dice, area of effect, and flavor text beyond just remembering the name of the spell and generally what it does.
There’s two approaches I have taken with this to help make it a little more accessible.
First is to leave the spell as-is and, when my kid asks to use it, I help explain each time what it can do. This is good in the sense that it doesn’t require modification to the game, and you have the opportunity to talk about strategy or explain different options pretty actively with your kid. The downside is that sometimes kids can get frustrated when it seems like there’s a lot of restrictions or a lot of rules to follow with more complicated spells.
The second approach is to modify the spells to fit your kid’s level. If you followed part one and only have a few spells you’re tracking, this shouldn’t require too much effort, but it does involve essentially rewriting the spells to allow a lot of general interpretation so your child can remember it without reading. It can also be hard to reign in the limits for some of the effects, but… if you’re running kind of a loose story, it can actually lead to some more creativity on your kid’s part.
For example, if you have a spell that normally would create a 30ft cone of cold magic that has a chance to freeze an opponent based on a specific role and will do 3d6 cold damage then recharge if you roll a 5 or a 6 on a six-sided die, I might rewrite that as:
You create a cold wind that blasts into the object right in front of you! You roll 3d6 damage (and this is represented by 3 squares to place the dice on the paper).
What I’ve done here is turned “30ft cone” into “right in front of you” so it is more comprehensible. I also got rid of tracking what type of damage is done, made freezing automatic, got rid of rolling to recharge, and made tracking damage rolls visual. I did this to simplify things even though it may make the spell imbalanced because I wanted my kid use the spell without my help.
4. Code spell slots for easy tracking
If you are tracking spell slots or limited spell usage, you can code it using colors or shapes so it is a little easier to track. Something like what’s shown below can mean more than having a typical spell list:
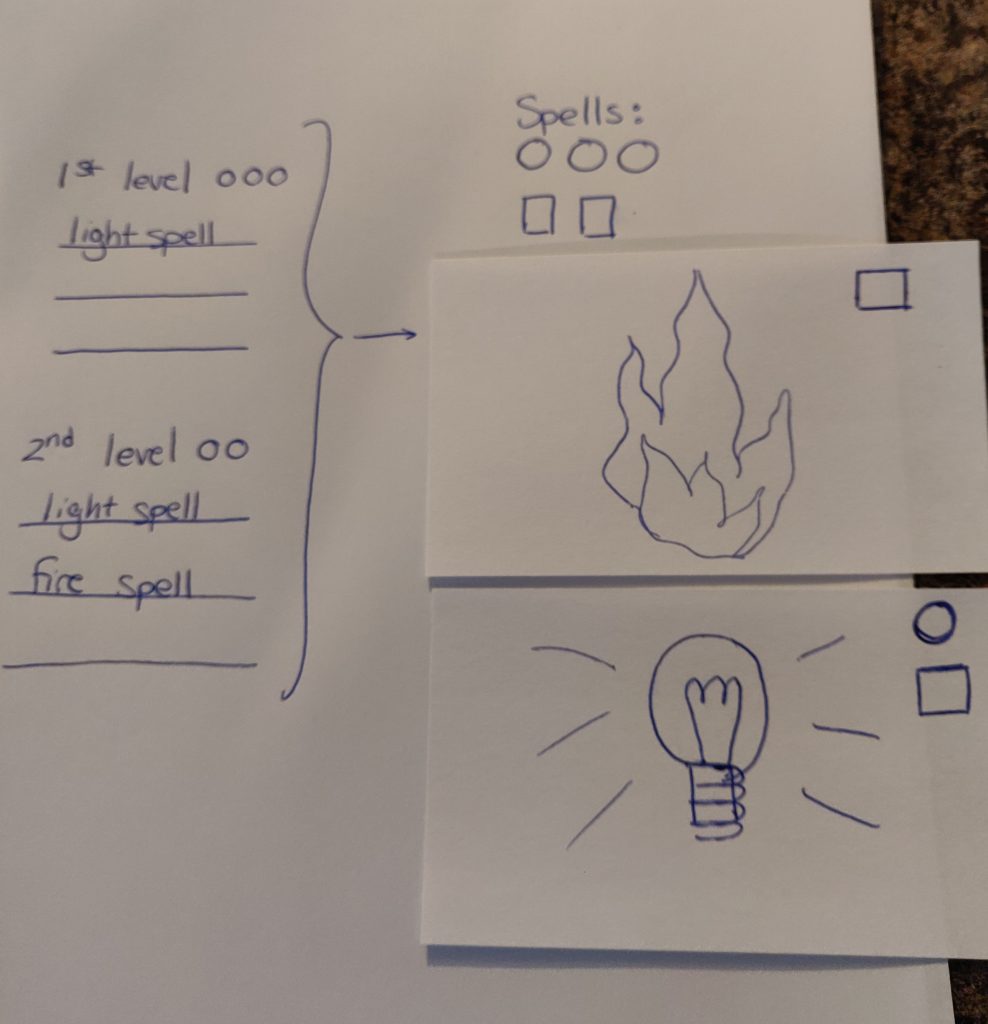
This shows that you get three circle spells and two square spells. The light spell can be cast as either a circle or square slot, but the fire spell can only be cast as a square spell slot.
This makes it easier because there’s no words to track, no need to comprehend what first/second or spell “level” means, and the shapes that you color to mark off spell slots actually mean something (versus all being circles). Kids just essentially need to match the shapes, and, once it is all colored in, they’re done.
There’s a few other ways of doing this too – you can use color coding, you can track how many times each spell is tracked right on their cards, you can give kids a limited number of stickers to use (one per spell), etc. Whatever you use, simplifying this to where your kids can track themselves does give another element where they not only gain autonomy when playing their character, but alleviates some of the work on the DM.
5. Practice using spells before they NEED to be used
Going back to that StoryGuider game that was helping to teach spells (I made it as kind of an intro step to other tabletop RPGs), at the beginning of the game, I have kids practice using the spells as part of their wizard training, and I give examples of what they do. The Great Spelldini shows Will, Wizard in Training, what each spell does before they can use it. Spelldini shrinks things, makes light, makes things fly, etc as each spell picture is given to the player.
This takes away the tension off players not knowing what a spell might do, and it ties the spells into the story, so they mean something beyond just mechanics. I also ask players in the story to pretend to cast the spells LARP-style during this “practice mode” and ask them what they think it would do.
I did experiment with this a bit when coming up with the spells intro for StoryGuider. When I tried giving my kid a set of spell cards with just an explanation (this spell makes a small fire, this spell freezes things), he had a ton of questions. The descriptions were just words that weren’t connected with an actual visualization yet.
Using a totally different set of spells (so I wasn’t influencing by repeating any), once I told the story about Spelldini using the spells first and had my kid run about and practice casting, as soon as we got to a story point where spells were needed, my kid immediately gave an answer and described it. It was more familiar, and I think he was able to visualize it much more easily because the words had been connected with the actions.
In conclusion…
There are a ton of ways to help with tracking spells, and I hope this list here helps to either give an outline that you can drag and drop into your games or sparks some ideas that you come up with! This is what I’ve tried with my kid, but every kid is different, so experiment with different methods and systems to see what works best for you and yours, and go have fun together!
Let me know in the comments if this article has helped or if you have your own recommendations and ideas!
If you liked this post, make sure to subscribe to the TTRPGkids monthly newsletter to stay up to date on the latest reviews, tips and tricks, game and podcast list updates, and more! Thank you for playing tabletop RPGs with your kids and sharing this awesome hobby with the next generation!