Tips and Tricks: Using Wrapping Paper to Make TTRPG Encounter Maps
Jump to:
- What type of paper to use and why
- Using wrapping paper to make 2D maps
- Making grid-marked 3D terrain
What type of paper to use and why
The dollar store near me always has a ton of wrapping paper on sale, and one tube is usually enough to cover several maps, so it’s a pretty good bang for the buck. I also like this as a way to use up leftover birthday and holiday wrapping paper that’s in an odd enough shape to where I can’t really wrap anything, but it might make for a good mini dungeon map. However, there’s a couple things to look out for, especially when getting or using lower cost paper from the dollar store:
- Make sure it has a cutting guide grid on the back
- Don’t get the shiny paper
- Pick a pattern without a lot of contrast or go with a solid color
For the grid, the whole point of getting wrapping paper for this is to utilize the grid on the back, so that’s a must. Most grid-marked wrapping paper will come with 1” spaced lines and is most often noted on the label since it’s a feature they want to advertise.

When it comes to the material, shiny paper is really hard to draw on unless you’re using a sharpie or some kind of special paint, so I would recommend avoiding anything with heavy coating or made from plastic-like material since it can really limit what you’re able to do later.
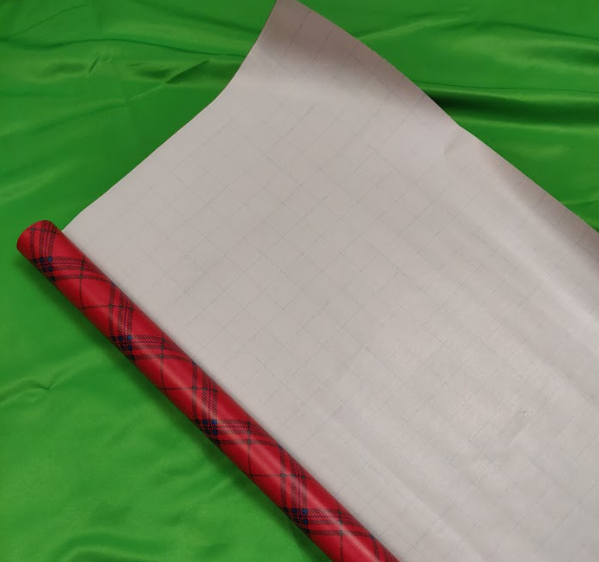
With patterns and colors, you want something that won’t show through to the white grid-marked side of the paper and be disruptive or confuse versus what you draw on the map. Most paper is thick enough that when it’s laid down on a table (no light shining through), it will appear white, but I have run into a few where a more bold pattern can show a little bit. Your best bet is to pick a solid color or to pick a pattern that has similar colors within it (i.e. the one here didn’t show through, but I might start to notice the pattern if it was light pink and black instead of red and black).
Using wrapping paper to make 2D maps
For making a 2D map that you draw all your game elements on, using wrapping paper starts you out with a 1” grid on the back, can give you huge maps (30-40 squares wide and hundreds of squares long), and rolls up for easy transport and storage. On top of that, it’s available almost everywhere, so you don’t need to order it online or go to a specialty store (where you might also pay quite a bit more).
All of this has you set up pretty well for a great surface to draw on, and you can easily have extra paper on hand for creating maps for unexpected encounters. You can have a whole tube of paper nearby, just cut the size of map that you would need, and start drawing your map features onto the white back.
Especially in games with my kid, I will let them help make our maps at the start of an encounter or challenge by filling in some basic areas and letting my kid color parts in. This helps them to get used to the map and register what features are present before we run our event for strategizing while also just being a fun activity to do mid-session. Since it costs me almost nothing for the paper, we can also draw as many redos as we want.
When I’m prepping games for the community center that I run TTRPGs at, I’ll cut and draw maps ahead of time then roll them all up for easy transport – I don’t have to worry so much about having multiple sheets available or folding them.
This works really well for standard maps, but then, you can do something pretty unique with wrapping paper that even grid-marked poster boards have some limitations for, and that’s having long hallways and gauntlet-style challenges. A lot of the paper that I have, when rolled out, can easily cover the whole length of a large conference table in a library or community center game room or be rolled out across the whole living room floor, so you can have all of your dungeon, with gridlines, on one sheet with your players going room to room exploring.
Making grid-marked 3D terrain
This isn’t just good for 2D maps that you draw on; it also works for adding a grid to anything that you can wrap up like a present. It is what this paper was made for, after all.
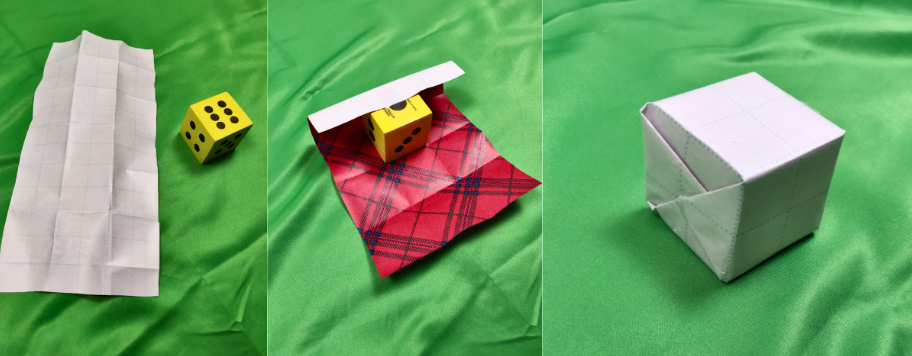
It’s thin and flexible enough to get around corners and curved surfaces alike, and it can easily be used to wrap old food boxes, pieces of cardboard, or canisters to create movable and reusable bridges, buildings, trees, and other terrain that has a grid for marking movement (and thereby naturally calculating movement differences up ramps or angled surfaces). Here, I’ve shown how to wrap three different objects so you have some examples.
One is a 2” foam die that lines up perfectly with the 1” grid marks on the paper.
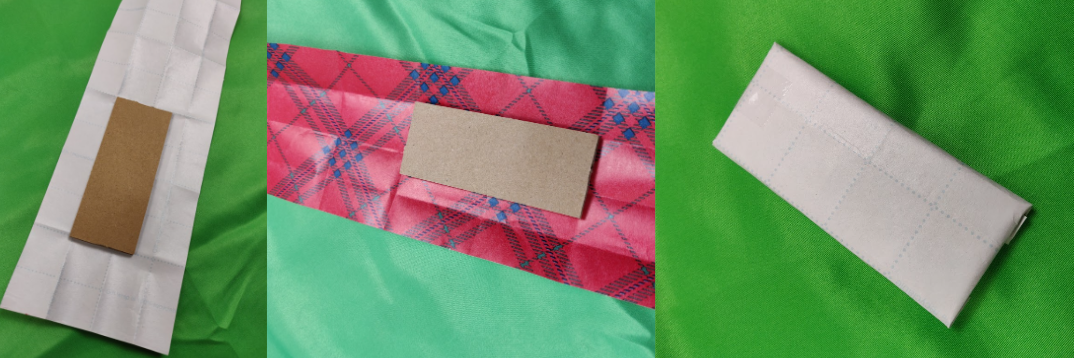
One is a piece of cardboard that does not line up perfectly with the lines on the paper.
The last is an odd shaped box that creates a ramp up to a platform.
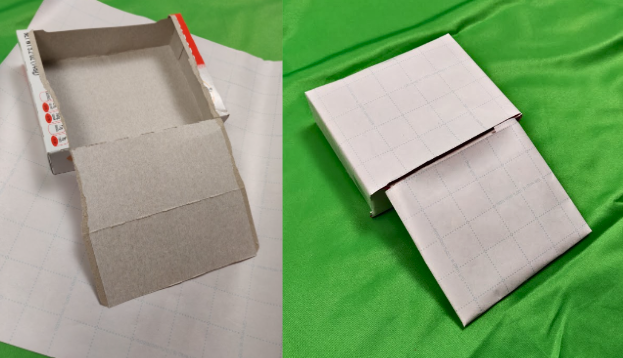
For all of these, I recommend folding the paper along the gridlines before you start wrapping so you have a guide when looking at the colored side of the paper to align at least one edge up with the edge of your object to be wrapped. After that, you can easily place it in the correct spot and wrap it up like a present.
For the ends, you can either do a triangle fold and line the points up so the grid meets or you can do a rectangle fold, which might be easier to align.
When you have odd shapes, like with the ramp and box, it’s OK to cut multiple pieces so it’s easier to fit it on to the object and keep the edges neat. If the grid doesn’t line up perfectly with the edges, that is OK to – this still gives a great guide for marking the objects you have and you can use your judgment to estimate what to do with partial squares (i.e. maybe it is disadvantage on dexterity checks if cornered in a tight space).
Once you have the objects wrapped, just place them on the board, and you’re ready to go! If you don’t tape them down, you can also reuse them or let your players move them around. In the example shown here where my kid helped color in our map, we made the cardboard piece into a ladder, and my kid had their character move it to get on top of the tall block. Having movable pieces like this that are clearly meant to be used, gives some extra creative freedom and can be an awesome tool for setting up interactable puzzles in your games.

Thank you for reading, and I hope these ideas help you to make some cool maps for your games! Please let me know in the comments your thoughts and ideas – I would love to hear them, and it could help give inspiration to other readers too!
If you liked this post, make sure to subscribe to the TTRPGkids monthly newsletter to stay up to date on the latest reviews, tips and tricks, game and podcast list updates, and more! Thank you for playing tabletop RPGs with your kids and sharing this awesome hobby with the next generation!
2 thoughts on “Tips and Tricks: Using Wrapping Paper to Make TTRPG Encounter Maps”