
Making a tabletop RPG for your particular kid: a quick start step by step guide!
Below is the walkthrough for the quick start version of Making a Tabletop RPG for YOUR Particular Kid, but also… I just crowdfunded a guidebook version of this covering the materials in this article plus XP from over 400 TTRPGkids articles HERE! The crowdfunding campaign ended in mid-Feb 2024 and will be fulfilled in May 2024, at which time digital and physical copies of the guide will be available again.
Jump to:
- Free step-by-step worksheet
- What is this guide?
- Step 1: Get on the same page
- Step 2: Figure out your kid’s story!
- Step 3: Choose mechanics!
- Step 4 (optional): Prep extra material
- Step 5: Enjoy!
Free step-by-step worksheet
First off, go grab a copy of the step-by-step worksheet here on my itch.io page. There’s two free quick start versions: one is a 1-page concise document if you prefer to have everything on one sheet in front of you, and the other is a, still relatively short, multi-page document that gives you a little more description and a little more space to write.
Once you have that, the guide in this article will both walk you through that worksheet in a step-by-step process and provide you with some extra resources that you can tap into along the way, if you want to dive into a topic a little further.

What is this guide?
Next, let’s talk about what this guide is and what our goals are. This guide is intended to be a “quick start” that you can use to create a tabletop role playing game that is tailored to your particular kid’s:
- Boundaries
- Interests
- Skill level
We want to make a tabletop RPG that is unique to your child. This could mean creating a story and mechanics from scratch OR tweaking an existing game system to meet your kid’s needs. I walk you through each step for:
- Creating a comfortable game space (for both you and your kid)
- Providing a clear method for pausing the game if things get overwhelming, kids get rowdy, etc
- Coming up with a setting, game events, and characters that your kid can connect with
- Building a meaningful player character with your kid
- Adjusting mechanics to your kid’s level
- Creating your own rules-lite mechanics
- Getting ideas for extra elements (like maps and coloring) to bring into the game
- Enjoying your game together!
This guide focuses on creating enough material for 1-2 game sessions at a time so you can do everything from trying out tabletop RPGs for the first time with your kid to building the foundation for a larger campaign with tools you can reuse each session.
This guide is framed from the perspective of a parent, teacher, or other guardian creating a game for their kids and filling the information out, largely, by themselves. However, I do want to note that this can be done collaboratively as well (i.e. kids help come up with game events and characters too).
I also want to say that there are many variations on tabletop RPGs that I can’t cover in a short “quick start” guide, so this document is by no means exhaustive. One of the beautiful things about tabletop RPGs is how creative you can get with them, so feel free to expand and explore ideas or pull from other sources as well!
Step 1: Get on the same page as your kid
Determine your no-go topics (i.e. set up some safety tools)
We want to start out by making sure we know what we DON’T want in the game before we actually start making things and creating our story elements. This helps us to make sure we aren’t putting anything into our game that our kids aren’t really willing to touch on, both out of respect for them and because it’s also just easier.
If a kid doesn’t want to play a game about fighting giant snakes because they don’t want to fight things and are terrified of snakes, but a giant snake monster shows up that they need to fight… there’s a good chance that your kid will probably not want to play the game with you.
Flip side… if you’re playing with older kids and you think they might try to RP dating with an NPC, you need to set ground rules up front if you aren’t OK with running that in the game.
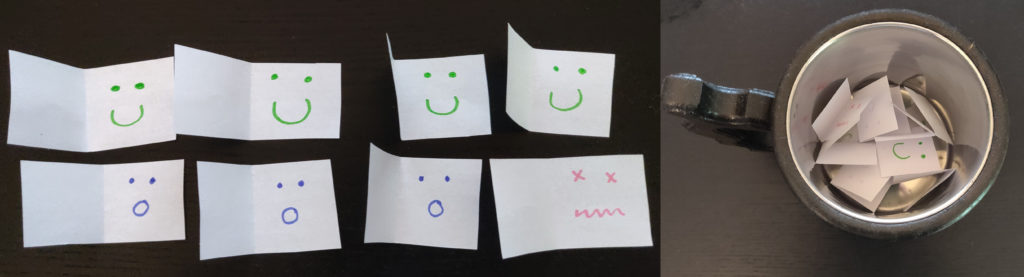
To make sure we get on the same page as them, we’re going to fill out something similar to the form at the end of Consent in Gaming by Monte Cook Games.
In section 1 on the worksheet, each player should fill out a list of topics that they want to discuss. For young kids who can’t write yet, ask them if there’s anything that they don’t want in the game, and you should fill it out for them. YOU should also fill out your topics too. If you want examples for topics to cover, check out here in another of my articles, Tabletop RPG Safety Tools for Kids.
Once you’ve all created this list, go through it (as a group or individually) and mark each topic as follows:
X = I do not want this in the game at all!
/ = We can mention it, but I don’t want it happening to my character
O = This is OK! Please include it!
And you now have a really clear list of topics to work with or around when we get into step 2!
Create an emergency stop
It is also really important to have a clear way to stop the game mid-session that the whole table understands and can use. Especially in games with kids, this is useful for a lot of different situations:
- Your kid is feeling overwhelmed and needs a minute
- You are getting overwhelmed by your kid’s in-game shenanigans
- The game touches on a topic that was missed in the no-go list
- You see that your kid needs a wiggle break
- Kids start arguing and you need to handle things out-of-game
- Your kid is getting REALLY frustrated with too many low dice rolls
- Your kid loses attention and wants to move onto the next topic

It takes a little pressure off the person stopping the game if you establish up front that it’s OK to take a pause and have a group signal that will guarantee an accepted break.
So, pick a method for pausing the game when needed and make sure, before the game starts, that everyone knows how to use it. This could be something as simple as saying a special word (my kid likes to shout out “snickerdoodles!”) or using an object (like the red block or using the X-card by John Stavropoulos) or any number of other ideas. Just make sure that you pick something that everyone can access.
Step 2: Figure out your kid’s story
Our goal with this section is to make a game that your kid really connects with. So, this is something that interests them, not necessarily what we think a tabletop RPG is. A lot of the classic examples of a tabletop RPG revolve around stories of dragons and wizards and dungeons, but not all kids are into that. Some are more into fluffy animals or a particular movie character or giant robots. If you can make a game based on those, you’re way more likely to get your kid into their first game and get it to stick.
Build the setting from your kid’s interests:
First, we want to take a look at what your particular kid likes. Make a list of some of their favorite TV shows, movies, books, toys, interests, etc (more detail and ideas here). You could also sit down with your kid and ask them if there’s any topics that they want to add to the list as well – it can be a lot of fun involving your kid in the world-building process.
After you have your list, cross out ones YOU don’t want to make a game about and circle ones you really do want to focus on. We want to make sure that you have some say in this and aren’t going to be running a game on a topic you really don’t like but just put up with for the sake of your kid (like I have done before). Everyone should be able to have fun with this.
Those circled topics now become the foundation for your setting! They may be weird and not seem to match, but that’s OK. Sometimes, you get a game about dinosaurs driving talking race cars or Moana and Wonder Woman teaming up to take on space pirates – these can be GREAT sparks for creativity, and I know my kid really appreciates having mashed up topics that he likes (especially if they’re a little wild).
Figure out your kid’s character:
Now that you have a general setting, we want to figure out who your kid wants to be in this game. Ask them details about their character!
They may want to play one of the main characters (like Wonder Woman in the previous example) or may want to pick a new character. Either is OK!
Your kid should write down (or you help them if they can’t write yet) some details like:
- Name
- Pronouns
- Who they are
- What do they like
- What don’t they like
- What do they want to do
- What do they look like
I suggest doing this part now, before you actually have the game fully planned, because this character creation helps you to see what your kid may want to do in the game. Within the same setting, the events that you plan next could change quite a bit depending on if your kid wants to play an edgy teen wizard who wants to learn more magic or if they want to play a wood sprite who wants to save the forest.
Knowing what your kid wants in their character can also give you a lot of honed in ideas for creating some story events. Using the previous example, if they want to play a wood sprite who is protecting a forest, you can give them something to protect the forest from.
Determine the story’s events:
We’ve talked a little about story events, but now we’re going to set them down for our game’s plan.
For one session, I usually try to have 3-5 events roughly planned so that I have enough material to go for an hour or two and my kid can pick and choose which paths to take. For example, if I have a festival going on, I might put in a foot race, archery contest, tree climbing race, hedge maze, and cook-off then give him time to pick 3 events before we move onto the next phase of the game.
So, think of 3-5 events to introduce for this session. If you’re stuck, look back at the list of your kid’s interests. Think about what typically happens in your kid’s favorite shows and books – Do they rescue injured animals? Do they search for treasure? Do they solve mysteries? Use these to give you some inspiration!
Create some world characters:
One of the hardest parts for me when running a game is actually coming up with random characters for my kid on the fly. I can improvise no problem once I’ve got the character in mind, but coming up with a shopkeeper name and basic personality out of the blue is really hard for me. So, I always set up a few “drag and drop” characters to have at the ready for when my kid wants their character to talk to someone.
To do this, think of at least 3 characters in the world that your kid could meet. Like with the previous section, if you’re stuck, think back to the interests list – what are characters like in their favorite shows and books? Are they talking animals? Are they classmates? Are they authority figures?
For each one, list some basic info (you don’t need a big story for each one). Start out with the following points, and add more information if you’d like:
- Name
- Pronouns
- What are they like?
- What do they want?
- Other:
Pick a starting point for your story:
For the last part in this section we want to get a solid starting point for the story. So, write down where the characters start. What type of place is it? What is it like there? Who or what kicks off the first of the game’s events? For picking your game’s starting point, it can be really fun to include your kid too – ask them where they think the story will start.
Step 3: Choose mechanics that match your kid
Consider your kid’s current level
Before actually choosing, tweaking, and making mechanics, note what your kid’s current level is for reading/writing and for counting/math.
It may seem obvious, but writing this down and having in front of you “my kid can count to 15” or “my kid can read short words” really helps focus everything back to your kid (which is the point of this particular guide).
If your kid can only count to 15 but you pick a game mechanic that requires counting to 20 and maybe some math on top of that, having your kid’s level written down makes it more obvious what you will need to help support your kid with counting and math during the game. It’s totally OK to do that (learning math through games can be great!), but know that there’s going to be that extra bit of complication (and possible stress) for you both, especially if this is their first try at a tabletop RPG.
Pick your mechanics: Option 1 – use a premade system
For this option, you’ll be picking an existing system from something you are already familiar with, your own research, or by reviewing a list (like the giant one that I made for this site).
Once you’ve picked a potential system, check the mechanics versus your kid’s level. Do they line up with your kid’s current reading/writing and counting/math abilities? If not, do you want to take over those roles for them, or do you want to modify the game?
For modifying the game, I list a few quick options in the worksheet, and I have a whole article here to check out for even more ideas!
If you are modifying the premade mechanics, I recommend adding notes to the game file so you remember the details later. I usually add digital notes or comments to digital files or sticky notes to physical copies so I’m not writing in my books AND so I can change things later. We want to have the option to work up to the full mechanics as our kids learn.
Pick your mechanics: Option 2 – create your own mechanics
If you want to create your own mechanics, you totally can, and it doesn’t have to be difficult. You can certainly make a complex system, but, since this is a “quick start” guide, I have a basic method for creating a rules-lite system here. I ask lots of questions below to help with getting ideas, but, for recording everything, I would definitely recommend checking the guide sheet since it’s laid out for you to write everything down a little more intuitively.
- Ask yourself how you want to randomize things in a way that aligns with your kid’s abilities?
- Do you want to use dice? If so, which ones and how many?
- Do you want to use something else like a deck of cards? Or flipping coins? Or rock, paper, scissors? Or something else (like this article)?
- Do you want to stick to just story-telling?
- What, from your randomization method, would represent a success? Is it rolling about a 7 on a d20 or maybe drawing a red card?
- What would represent a failure or complication?
- Are there any other possible results that you want to detail?
- Are there any other special mechanics you want to add? For example, do you want to adopt rolling with advantage from D&D or allow players to add a modifier for working together?
Write all of this down and… you’ve just made your very own rules-lite game system!
Step 4 (optional): Prep any extra game materials
This part is entirely optional since you can run a tabletop RPG through just “theater of the mind” (describing and imagining what’s going on without a map or any visuals in front of you). However, it can be fun to include maps, props, and more, and it can help keep your kid’s attention on the game if they have something to look at or move around on a game board every so often.
You can try out:
- Maps
- Minis
- Coloring pages
- Art supplies
- Activity sheets
- Music
- Props
- Notecards for tracking
- Anything else you want to include

I also have a bunch of other craft articles to consider as well (these can be fun projects to include the kids on!):
Again, these are all optional, but now is the point in the process that you would be setting these extras up before actually starting the session with your kid!
Step 5: Enjoy your game with your kid!
Now, you’re about all set! Review the final rules, show your kid examples of some of the mechanics (if needed), and then play your game using your worksheets as a reference!
Once you start playing, there can be other challenges, like plans going way off the rails or mid-game social-emotional conflicts – I will cover those in other articles, but, for here, just know that if it isn’t perfect the first time, it takes practice. Tweaking things and trying again is part of the continued learning process as you and your kid learn how best you play tabletop RPGs together! It is an awesome journey growing together in this, and… just remember as you play:
- Stay on the same page with boundaries
- Pause or stop if anyone needs a break
- Try to be flexible if plans stray
- Be kind
- Remember that this takes practice (for both you and your kid)
- Enjoy this time together!
Thank you for playing tabletop RPGs with your kid! Have fun with your game!
And please follow along to get ready for the full 50+ page version that condenses knowledge and XP from the 350+ articles on TTRPGkids into one book HERE! The crowdfunding campaign will go live in mid-January 2024!
If you liked this post, make sure to subscribe to the TTRPGkids monthly newsletter to stay up to date on the latest reviews, tips and tricks, game and podcast list updates, and more! Thank you for playing tabletop RPGs with your kids and sharing this awesome hobby with the next generation!
11 thoughts on “Making a tabletop RPG for your particular kid: a quick start step by step guide!”